Showing posts with label Tricks. Show all posts

Thursday, 26 April 2018

Top Computer Tricks Every Geek Should Know (Keyboard Shortcut's)


  • Aero Shortcuts

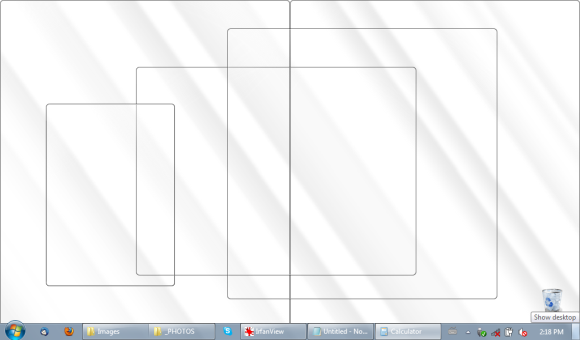
    • [Windows] + [Spacebar] (Aero)
  • [Windows] + [Spacebar] (Aero Peek)
    Make all open windows transparent to view gadgets and icons on desktop.
cool keyboard tricks
  • [Windows] + [D] (Aero Peek)
    Show or hide the desktop.
  • [Windows] + [Home] (Aero Shake)
    Minimize all but selected window. Reverse by clicking the key combination again.
  • [Windows] + left arrow OR [Windows] + right arrow (Aero Snap)
    Dock selected window to the left or right half of your screen.
  • [Windows] + up arrow OR [Windows] + down arrow (Aero Snap)
    Maximized and restores the selected window.
  • [Windows] + [SHIFT] + up arrow OR [Windows] + [SHIFT] + down arrow (Aero Snap)
    Maximizes and restores selected window in vertical dimension only.
  • [Windows] + [Tab] (Aero Flip)
    Launch 3D representation of open windows and click [Tab] key again to flip through them.

Windows & Taskbar

  • [Alt] + [Ctrl] + [Tag] + left/right/up/down arrow
    Flip window.
  • [Alt] + [Tab]
    Cycle through open windows.
windows 7 keyboard tricks
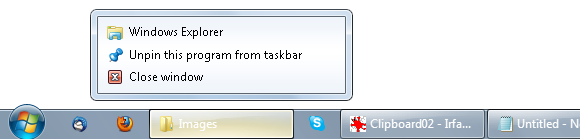
  • [Windows] + [T] OR [Windows] + [SHIFT] + [T]
    Move focus to front or back of taskbar. Press [T] again while holding the [Windows] key to cycle through items in the taskbar from left to right or, with [SHIFT] button held too, from right to left.
  • [Windows] + [B]
    Puts focus on the ‘show hidden icons’ button on the system tray.
  • [Windows] + [1] THROUGH [Windows] + [9]
    Launch first through ninth icon on taskbar, including items pinned to taskbar.
  • [Windows] + [SHIFT] + [1] THROUGH [Windows] + [SHIFT] + [9]
    Starts new instance of respective taskbar icon.
  • [Windows] + [Ctrl] + [1] THROUGH [Windows] + [Ctrl] + [9]
    Cycles through multiple instances of the respective icon.
  • [Windows] + [Alt] + [1] THROUGH [Windows] + [Alt] + [9]
    Opens jump list for respective icon.
fun keyboard tricks

Multiple Monitors

  • [Windows] + [SHIFT] + right arrow OR [Windows] + [SHIFT] + left arrow
    Move selected window from one monitor to another. They will remain in the same relative location.
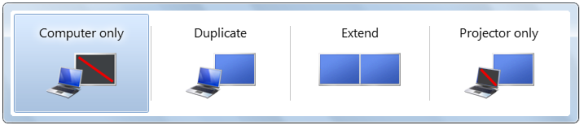
  • [Windows] + [P]
    Select presentation display mode.
fun keyboard tricks

Magnifier

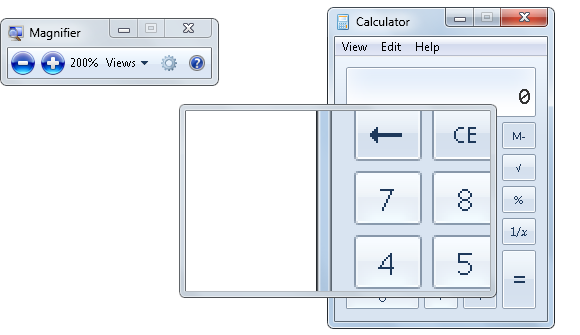
  • [Windows] + [+] OR [Windows] + [-]
    Activates Windows Magnifier to zoom in or out of screen.
  • [Ctrl] + [Alt] + [D]
    Switch to docked mode.
  • [Ctrl] + [Alt] + [L]
    Switch to lense mode.
fun keyboard tricks windows
  • [Ctrl] + [Alt] + [F]
    Switch from docked or lens mode back to full screen mode.
  • [Ctrl] + [Alt] + [I]
    Invert colors.
  • [Windows] + [Esc]
    Exist magnifier views.

Other

  • [Windows] + [G]
    Cycle through desktop gadgets.
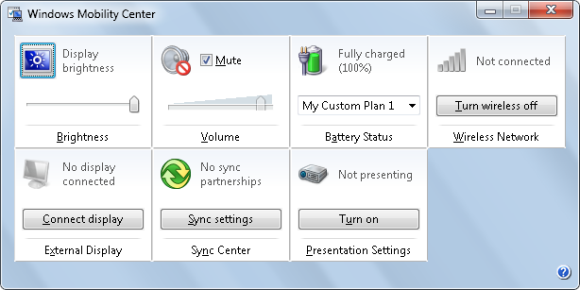
  • [Windows] + [X]
    Launches Windows Mobility Center. Especially useful if you’re working on a laptop.
windows keyboard tricks
Can’t get enough? The following articles describe lots of additional keyboard tricks and shortcuts to make use of:

Thursday, 3 December 2015

How to Backup Android contacts without Any Application

First of all, before updating your android device it is vital for you to create a backup of  your contacts so that the probability of losing your contacts becomes zero. Although, in most cases it is not necessary but if luck is not on your side then you might end up losing all your information like messages and contacts. Android users have something to
cheer about though as Google has allowed its Android users to link their accounts with Gmail. This enables the contacts syncing with your gmail account. Thus it is understood that if your phone is linked to your gmail account than your contacts are safe. In order to check this, one is required to visit his/her gmail account. Then, click on the Google logo on the top left side and select contacts from the drop down box that appears. If you see your contacts, then your contacts are backed up by
Google. However, if the list does not appear then there is something wrong and you are to take additional steps to ensure that your contacts are backed up. One can backup his/her contacts by opening settings from the apps menu and then open back-up and reset. All you need to ensure is that the backup my data option is ticked. If it is, then your phone will backup the contactsfor you. If it is not checked, then check it immediately. Backing up contacts ensures that if your phone is lost or any other situation that may result in getting a new phone, then relax, your contacts are safe and sound.
There are also certain apps available for Android users that enables them to backup their contacts. One such app is called Super Backup. It is easily the quickest app for backing up for Android users. This app enables users to backup their contacts and messages so that you never lose your data
again. By default, the backed up data is stored in internal memory. However, if you are going
to factory reset your phone then it is strongly recommended that you select memory card as
your default backup folder. Some of the features of Super Backup include: Creating a
backup of apps on your memory card and also restore it; backup and restore messages,
contacts and call logs; backup sms conversations; delete backup data and many
more features. Here is yet another way to backup Android contacts.

1. First of all, open up your contact list.
2. Touch the menu button, and a from the
menu that appears select the import/export
tab.
3. Then, you will see a list of options for
import and export:
4. Thereafter, select a suitable option
according to your needs and you will backup
your contacts:
The last step involves importing the contacts
to your phone.

Tuesday, 1 December 2015

How to change your folders background

Step 1: Have the Folder you want to put the background on open!


Step 2: Open up Notepad, then simply paste in this code:
 [{BE098140-A513-11D0-A3A4-00C04FD706EC}]
iconarea_image=***Picture Location Here!***\***Name of File!***


Step 3: Go to ur picture (the picture you want to use!) and right click and select
properties and find the file location for example lets say my file is in "my hardrive" it
would be located at "C:\\" understand? copy the location!

Step 4: Now go back to ur text document (notepad) and where it says ***Picture
Location Here!*** paste the location...u copied in the previus step!

Step 5: Now after u've done that where it says ***Name of File!*** type the name
of the file including the .jpg .bmp .bip. jpeg etc

Step 6: Save the text document as "desktop.ini" be sure to remember the .ini
extension! click Save as "All Files" not "Text Document" and save the document in the
folder where u want the background to be!

Now just close the folder and open it again it should show the picture as a
background!

Thursday, 20 November 2014

Make your Computer Welcome You

Do you watch movies? Have you always loved the way how Computers in movies welcome their users by calling out their names? I bet that you too would want to know how you can achieve similar results on your PC and have a computer said welcome.

Then you are at the right place, this article describes exactly how you can make your computer welcome you like this.

With this trick, you can make your Computer welcome you in its computerized voice. You can make your Windows based computer say "Welcome to your PC, Username."

Make Windows Greet you with a Custom Voice Message at Startup

To use this trick, follow the instructions given below:-


  1. Click on Start. Navigate to All Programs, Accessories and Notepad.
  2. Copy and paste the exact code given below.
Dim speaks, speech
speaks="Welcome to your PC, Username"
Set speech=CreateObject("sapi.spvoice")
speech.Speak speaks
     3.  Replace Username with your own name.
     4.  Click on File Menu, Save As, select All Types in Save as Type option, and save the file as Welcome.vbs or "*.vbs".
     5.  Copy the saved file.
     6.  Navigate to C:\Documents and Settings\All Users\Start Menu\Programs\Startup (in Windows XP) and to C:\Users\ {User-Name}\AppData\Roaming\Microsoft\Windows\Start Menu\Programs\Startup (in Windows 8, Windows 7 and Windows Vista) if C: is your System drive. AppData is a hidden folder. So, you will need to select showing hidden folders in Folder options to locate it.
     7.  Paste the file.


 Make your Computer Welcome you at startup

Now when the next time you start your computer, Windows will welcome you in its own computerized voice.

Note: For best results, it is recommended to change sound scheme to No Sounds.
You can change the sound scheme to No Sounds by following the steps given below:-
  1. Go to Control Panel.
  2. Then click on Switch to Classic View.
  3. Then Click on Sounds and Audio Devices.
  4. Then Click on the Sounds Tab.
  5. Select No Sounds from the Sound Scheme option.
  6. If you wish to save your Previous Sound Scheme, you can save it by clicking Yes in the popup menu.
  7. Click on OK.
Change Sound Scheme to No Sounds

Try it yourself to see how it works. In my personal opinion, this is an excellent trick. Whenever I start my PC in front of anybody and the PC welcomes me, the fellow is left wondering how brilliant a computer do I have.

Friday, 25 April 2014

How to Customize the Lock Screen on Windows 8


Windows 8’s lock screen is very at home on a tablet, but it can also be used on laptops and desktops.  The lock screen is not just a background image – it contains widgets that display quick notifications.

These widgets, known as lock screen apps, allow you to view information – such as new emails, weather, calendar appointments, instant messages or social updates – without even unlocking your PC.

Note: Windows 8.1 works roughly the same way. The screenshots will look slightly different, but it’s nearly the same thing.

Disable the Lock Screen
If you do not like the lock screen, you do not have to use it.  Unfortunately, Microsoft has buried the “disable lock screen” option. Luckily, disabling it is simple:

How to Disable the Lock Screen Using the Registry – This process works on all editions of Windows 8.  We’ve even provided a .reg file you can easily download and double-click to make this change.
How to Disable the Lock Screen Using Group Policy –  If you have the Professional edition of Windows 8, you can use the group policy editor to disable the lock screen.
Once you’ve made this change, Windows will always display the password prompt, saving you a key-press during the login process.


Select a Lock Screen Background
Lock screen settings are located in the PC setting application on Windows 8.  To access it, open the Settings charm (press Windows Key + I to quickly open the Settings charm from anywhere in Windows) and select Change PC settings.

Select the Personalize category and select Lock screen.  Click (or tap) one of the provided background images or use the Browse button and select any image from your computer, Bing, SkyDrive, or even your camera.

If you want more features, try using the Chameleon app located in the Windows Store.  It can watch “photo of the day”-type services and automatically change your lock screen background on a schedule, a feature not included with Windows 8.


Configure Lock Screen Apps
Lock screen widgets – known as “lock screen apps” in Windows 8 – allow you to view information at a glance.  Apps added to the lock screen are allowed to run in the background when your PC is locked so they can fetch new, updated information and display it on the lock screen.

You can configure the list of lock screen apps from the Lock screen apps section below the lock screen background chooser.  Click (or tap) an icon and select the app you want in that location.  You can get more widgets by installing more Windows Store apps – apps can choose to include lock screen integration.  If you do not want any lock screen apps – or just want a few – you can select the Don’t show quick status here option.

You can also choose an app to show a more detailed status.  For example, when you choose to display a detailed weather status, you will see the weather displayed in text on your lock screen.

That’s it for customizing the lock screen – it’s all about background images and lock screen apps.  However, with custom backgrounds and apps, each person’s lock screen could look different.


How to Set a Custom Logon Screen Background on Windows 7

Windows 7 makes it possible to change the welcome screen that appears when you start your computer without any third-party software, but this setting is well hidden. You can set any image you like as your background.


If you are using Windows 8 and want to accomplish the same thing, we’ve got you covered with a tutorial on changing the lock screen in Windows 8.

This setting is intended for original equipment manufacturers (OEMs) to customize their systems, but there’s nothing stopping you from using it yourself. All you have to do is change a single registry value and put an image file in the correct location.


Enabling Custom Backgrounds
This feature is disabled by default, so you’ll have to enable it from the Registry Editor. You can also use the Group Policy Editor if you have a Professional version of Windows – scroll down a bit for the Group Policy Editor method.

Launch the Registry Editor by typing regedit into the search box in the Start menu and pressing Enter.

In the Registry Editor, navigate to the following key:
HKEY_LOCAL_MACHINE\SOFTWARE\Microsoft\Windows\CurrentVersion\Authentication\LogonUI\Background


You’ll see an DWORD value named OEMBackground. If you don’t see it, right-click in the right pane, point to the New submenu and create a new DWORD value with this name.

Double-click the OEMBackground value and set its value to 1.

Note that selecting a new theme in the Appearance and Personalization window will “unset” this registry value. Selecting a theme will change the value of the key to the value stored in the theme’s .ini file, which is probably 0 – if you change your theme, you’ll have to perform this registry tweak again.


Changing the setting in group policy will allow it to persist even when you change your theme, but the Group Policy Editor is only available in Professional editions of Windows.

If you have access to the Group Policy Editor, launch gpedit.msc from the Start menu.

Navigate to the following section in the Group Policy Editor window:

Computer Configuration\Administrative Templates\System\Logon

You’ll find a setting named “Always use custom login background.” Double-click it and set it to Enabled.

Setting An Image
Your image file must be less than 256 KB in size. It’s also a good idea to use an image file that matches the resolution of your monitor, so it won’t look stretched.

Windows looks for the custom logon screen background image in the following directory:

C:\Windows\System32\oobe\info\backgrounds

By default, the info and backgrounds folders don’t exist. Navigate to the C:\Windows\System32\oobe folder and create them yourself by right-clicking inside the folder, pointing to New, and selecting New Folder.

Copy your desired background image to the backgrounds folder and name it backgroundDefault.jpg.

The change will take effect immediately – no system reboot required. The first time you log out or lock your screen (try the WinKey-L keyboard shortcut), you’ll see your new background.

Third-Party Tools
You don’t have to do this by hand. There are a variety of third-party tools that automate this process for you, like Windows Logon Background Changer, which we’ve covered in the past. Windows Logon Background Changer and other utilities just change this registry value and put the image file in the correct location for you.


To get the default logon screen back, just delete the backgroundDefault.jpg file. Windows will use the default background if no custom background image is available.


Saturday, 25 January 2014

(Free Money) Likes Planet.com get free facebook likes and social network sites (FREE MONEY)


Hi Friends, All we are use facebook, twitter and other social networking site. Likesplanet is an website it gives social network exchange likes.


LIKESPLANET:
        First go to Likes Planet. Sign up using my referral link

Once you finish sign up earn points from facebook likes, facebook photo likes, facebook shares, facebook followers, youtube views,likes,dislikes,subscription, and twitter follwers, twitte, website traffic. This way to earn points with likes planet.
Likesplanet gives money for every users if you get 3000 points you will earn 0.7$. minimum payout 0.7$ via paypal

Get Likes:
              Your facebook page,photo and mention above paragraph you get all activites. Next you add page what will you need fb likes,photo like, shares and twitter.

                   
My facebook page Computer Tricks i get 200 likes for two days and also another facebook page

Conclusion:
            My review about likes planet is a social network exchange likes. For any business pages in the facebook it leades to cost but it gives free to get.


             "Why pay When you get free"

Thursday, 16 January 2014

iOS 7 Jailbreak Has Released For iPhone, iPad, iPod Devices


 iOS 7 Jailbreak Has Released For Your iPhone, iPad, iPod Devices. Evad3rs team has released jailbreak for iOS 7 devices just after 3 months of iOS 7  released. 

What is Jailbreak : iOS jailbreaking is the process of removing the limitations on Apple Inc. devices running the iOS operating system through the use of software and hardware exploits; such devices include the iPhone, iPod touch, iPad, and second-generation Apple TV. Jailbreaking permits root access to the iOS operating system, allowing the download of additional applications, extensions, and themes that are unavailable through the official Apple App Store.

Requirements
1. Take Manual backup of your iPhone before using evasi0n tool for jailbreak.
2. A computer, running Windows (XP minimum), Mac OS X (10.6 minimum) or Linux (x86 / x86_64).
3. iTunes installed if you're running Windows.
4. An iPhone, iPad or iPod running iOS 7.0 through 7.0.4.
5. A USB cable to connect the device to the computer.
6. Disable the lock passcode of your iOS device before using evasi0n. It can cause issue.


How To Jailbreak iOS 7 on Windows & Mac with Evasi0n7:
Step 1: Download iOS 7 Jailbreak tool, Evasi0n for your Windows or Mac PC / Laptop
Step 2: Unzip / Load .dmg file to access evasi0n7.
Step 3: Connect your device with USB cable to your computer, and wait for few seconds, so, Evasi0n7 detects it.
Step 4: Once connected with Evasi0n7, simply press the Jailbreak button.
Step 5: The on-screen Evasi0n7 details will lead you to the next step, where it requires you to click the Evasi0n icon from your iPhone / iPad / iPod Touch.


After jailbreak iPhone will reboot with Cydia.


Download For Windows

Sunday, 12 January 2014

NSA Spying on you ?? Read below on on ways to stop the NSA spying on you !!


1. Browse anonymously with TOR

NSA whistleblower Edward #Snowden has been photographed with a Tor sticker on his laptop. Tor lets you use the Internet without revealing your IP address or other identifying information. The distributed network works by bouncing your traffic among several randomly selected proxy computers before sending it on to its real destination. Web sites will think you’re coming from whichever node your traffic happens to bounce off of last, which might be on the other side of the world.

Tor is easy to use. You can download the Tor Browser Bundle, a version of the Firefox browser that automatically connects to the Tor network for anonymous web browsing.

2. Keep your chats private with OTR

If you use a conventional instant messaging service like those offered by Google, AOL, Yahoo or Microsoft, logs of your chats may be accessible to the NSA through the PRISM program. But a chat extension called OTR (for “off the record”) offers “end-to-end” encryption. The server only sees the encrypted version of your conversations, thwarting eavesdropping.

To use OTR, both you and the person you’re chatting with need to use instant messaging software that supports it. I use Pidgin, which works with Google, AOL, Microsoft and Yahoo’s chat networks, among others. #Linux users can also use Pidgin. OTR works as an extension to conventional instant messaging networks, seamlessly adding privacy to the IM networks you already use. You can configure Pidgin so that if a person you’re chatting with is also running an OTR-capable client, it will automatically encrypt the conversation.

3. Make secure calls with Silent Circle

The conventional telephone network is vulnerable to government wiretapping. And many Internet-based telephony applications, including #Skype, are thought to be vulnerable to interception as well.

But an Internet telephony application called Silent Circle is believed to be impervious to wiretapping, even by the NSA. Like OTR, it offers “end-to-end” encryption, meaning that the company running the service never has access to your unencrypted calls and can’t turn them over to the feds. The client software is open source, and Chris Soghoian, the chief technologist of the American Civil Liberties Union, says it has been independently audited to ensure that it doesn’t contain any “back doors.”

4. Remove your cellphone battery to stop being Tracked

The NSA phone records program revealed by the Guardian last week not only collects information about what phone numbers we call, it also collects data about the location of the nearest cellphone tower when we make calls. That gives the NSA the ability to determine your location every time you make a phone call — and maybe in between calls too.

Unfortunately, Soghoian says there’s no technical fix for this kind of surveillance. “The laws of physics will not let you hide your location from the phone company,” he says. The phone company needs to know where you are in order to reach you when you receive a phone call.

So if you don’t want the NSA to know where you’ve been, you only have one option: You need to turn off your cell phone. Or if you’re feeling extra paranoid, take out the battery or leave your phone at home.

Monday, 6 January 2014

4 Ways to Fix most Common Issues or problems On an Android Device


4 Ways to Fix most Common Issues or problems On an Android Device

Having an Android smartphone or tablet is like giving candy to a little baby: you just can’t stop from tweaking, changing, customizing and optimizing the internal system and OS. That’s why I think that all the Android users had performed, at least once, complex operations like rooting, installing custom ROMs, replacing the stock recovery, unlocking the bootloader and so on, on their devices and this without knowing that the procedures are unofficial and risky tasks. Therefore, don’t get surprised if after applying one of the mentioned operations, you will notice that there is something wrong with your handset.

Usually and the most common issues that might occur are: your phone / tablet gets stuck in a boot loop, the handset boots only into recovery mode, your smartphone can be entered only in bootloader mode, you can’t properly install a custom ROM and different errors are being displayed while trying to fix the mentioned problems.

Well, during the present step by step guide I will show you how to easily fix the most common issues related to the Android OS and bringing you device back to life. Actually I will explain and detail four methods that can be anytime used by those who had bricked their Android based smartphones / tablets, all being described in an easy to understand way, so everyone can understand what to do and how to apply the guidelines for fixing the problems in the shortest time possible.

So, if you have managed to brick your Android device and looking for a suitable and easy method to fix the problems, then you are in the right place. The methods explained below will resolve the booting loop problems along with other issues so don’t hesitate and use our guidelines. But first do remember that the solutions described during the following lines might, or might not work for your smartphone / tablet; also we shouldn’t be held responsible if you can’t fix your Android handset.

Do take note that operations like rooting, installing a custom ROM and so on are unofficial ones and by completing the same the warranty of your device gets voided. Therefore, at this point, your phone comes without warranty. That’s why you need to first try to fix your device before heading to your retail.

Your handset is stuck in a boot loop

Well this is the most common issue when talking about Android devices. Also, the problem can be easily fixed as you only have to wipe the system of your device. Usually, the boot loop problem is occurring when flashing custom ROMs; you should know that after updating with the firmware, a wipe is being required. If you somehow skip the wipe, your phone will keep rebooting.

Now, on this method we assumed that you have installed a custom recovery image on your handset: like CWM recovery, AmonRA, TWRP recovery and so on. Well, use the recovery for wiping the system of your handset and for resolving the boot loop issue. Be aware though as each device can be entered in recovery mode differently; usually you need to press a combination of buttons (for example on Samsung you need to press Volume Up and Home buttons) while Powering up your tablet / smartphone. Once the recovery mode entered you need to select:

Use the Volume keys in order to navigate through the recovery menu.
Select “advanced” and choose “wipe dalvik cache”.
Return to main menu.
Then select “wipe data factory reset”.
Return and this time choose “wipe cache partition”.
Return and select “reboot system now”.
Your handset should start in Android OS now.
So, there you have it; now the boot loop problems should be resolved and you should be able to safely use your custom ROM firmware.

Your handset boots straight to recovery mode

In case after flashing a custom ROM, your handset enters right to recovery mode, then you can try to wipe the system and see the results. But, most likely the wiping solution will not work here. You see, if your device is stock in recovery mode, then it means that you have flashed the ROM inadequate, or there is something wrong with the ROM you choose.

Therefore, you will have to re-install the firmware on your phone, or to choose another software suitable with your smartphone / tablet. Now, during the following list I will show you how to properly update your Android device with a custom ROM firmware.

First backup the data that is saved on the internal storage memory of your smartphone.
Enable the USB debugging option on your handset.
Download the update file on your computer; don’t unzip the file.
Remember that your device must be rooted and installed with a custom recovery image.
Place the ROM file from the computer to your phone’s SD card.
Then turn off your device and reboot it into recovery mode.
From recovery mode wipe the system as showed during the previous method.
Then return to the recovery menu and select “install zip from sd card” and “choose zip from sd card”.
In the end reboot your phone.
Do note that if your handset gets stuck in a boot loop you will have to reboot into recovery mode once more for wiping the internal system (the cache, the dlavik cache and wipe data factory reset).
So, now you know how to properly install a custom ROM firmware. Remember to check all the details related to the update you are choosing are usually, the unofficial versions of the Android system are coming with bugs and issues and that’s why you might end up in bricking your Android device and as you cans see fixing your handset is taking some time.

Your device is booting straight to bootloader mode

On this case the only way in which you can resolve the problem is the stock Android OS. Yes, unfortunately you will have to flash the official Android firmware on your device. In this way you will be able to restore the stock restrictions and default settings and your smartphone / tablet will be restored to its initial state.

Of course, if your handset is rooted, after flashing the stock ROM, the root access will be revoked and the bootloader relocked. The best though is that you will be able to restore the lost warranty and the default Android system with stock features, apps and capabilities.

Now let’s see how you can update or downgrade different devices to stock / official Android firmware:

For Samsung:

You need to use a Windows running computer, where you will have to download Odin and the update file.
Unzip both files and also install and run Odin.
Furthermore, on the PC the smartphone’s drivers must be installed; you can use Samsung KIES for completing the same.
Then, reboot your handset in download mode (usually by pressing on Volume Down, Power and Home buttons) and connect your device with the computer.
From Odin now select “PDA” and pick the update file.
Press “start” and wait while the software is being applied.
For HTC:

The HTC stock ROMs are dubbed as RUU and the same can be flashed straight from bootloader mode.
So, get the RUU specific file for your device and place the same on the SD card.
Rename the file into something like PG05IMG.zip.
Then as soon as you reboot your device the firmware should be flashed automatically, from HBOOT, HTC’s bootloader.
For Motorola:

On your computer you will have to use RSD lite, which is a program similar with Odin, but in this case, it is suitable on with Motorola’s handsets.
So, download and install RSD Lite.
Also install the phone’s drivers on your computer.
Download the update file on your computer.
Turn off your device and connect it with the computer.
Reboot your handset into bootloader mode.
Launch the RSD Lite program.
Pick the .sbf file from the computer and start the flashing process.
In the end the device will reboot into Android; don’t unplug the USB cable until you are sure that the Android system is booted; if not re-do the update operation until it works.
If anything isn’t working for you, format your SD card

There might be situations when the up described guidelines won’t fix your bricked Android device. Well, in that case, there might be problems with your handset’s SD card – as you could notice on all the methods from above the SD card was used. You see, after using your SD card for a while, it might get corrupted, meaning that you will stock data on it without obtaining any kind of result.

So, you might resolve your problems by formatting the SD card. Of course, then you will have to return here and resume the tutorial from the beginning for fixing your bricked smartphone / tablet.

Formatting the SD card is easy and can be completed in a minute. All you have to do is to take the SD card, place it on your computer, or on an SD card reader. Wait while your PC is recognizing your SD card and then right click on the drive and select “format”. That’s all.

Well that was how you can easily resolve the most common issues that might occur while trying to tweak your Android powered handset. So, now you know how to fix your bricked smartphones / tablets. Do share your impressions and experience with us and with other users by using the comments area from below and also tell us if you had encountered other problems while using your device. Also, stay close for receiving further Android tips, tricks and step by step guides

Tuesday, 31 December 2013

How To Make Window 7 100 % Genuine


How To Make Window 7 100 % Genuine
There is a software that is WAT(windows activation Technologies ) from the window 7 which is
 responsible for the checking the window is genuineness of window so then after removing  the WAT(windows activation Technologies) files then the system will have no need for the genuine
 keys that make it active cause without the  WAT(windows activation Technologies) it will always Genuine.

 REQUIREMENT AND BENEFIT Of Window 7

1) Instead of the 30 days of a trial version you can use the window 7 use for the life long

2)Its works with the all version of the window 7
Microsoft Windows 7 Home Premium

Microsoft Windows 7 Home Basic

Microsoft Windows 7 Professional

Microsoft Windows 7 Ultimate

Microsoft Windows 7 starter

3) Its compatible with the 32 bit and also for the 64 bit file system .

IMPORTANT NOTE:

After that you will not be able to update the window and if you do so it might do inactive your window and if any update of the window find that your OS is the pirated .

So here are the crack tools

1.      1.  Remove WAT Download http://www.mediafire.com/download/9ddmrnbru0ayfyn/WATRemover+2.2.zip

OHOW TO CRACK THE WINDOW :

Window 7 cracker are the very easy to use that you can use it without. Having knowledge about the system now what you have to do is just simple Download the WAT (windows activation Technologies) and then

1. Extract

2. Then Open rw.exe

3. Then click on the button "remove WAT"

4. Then finally wait for your computers to the reboot then the computer no longer have to a genuine status.

Thursday, 26 December 2013

Command Prompt Tricks and HacksCommand Prompt Tricks, Hacks

The Windows Command Prompttool, and many of its commands, might seem boring or even relatively useless at first glance, but as anyone who has ever used the Command Prompt very often can tell you, there's much to love! Below are several Command Prompt tricks and other Command Prompt hacks that I guarantee will get you excited about many of the mundane sounding Command Prompt commandslike telnet, tree, or robocopy... okay, robocopy sounds pretty cool. Some of these Command Prompt tricks and hacks are special features or uses of the Command Prompt itself, while others are just neat or relatively unknown things you can do with certain commands. Enjoy! 1. Use Ctrl-C to Abort a Command Just about any command can be stopped in its tracks with the abort command: Ctrl-C. If you haven't actually executed a command, you can just backspace and erase what you've typed, but if you've already executed it then you can do a Ctrl-C to stop it. Warning:Ctrl-C isn't a magic wand and it can't undo things that aren't undoable, like a partially complete format command. However, for things like the dir command that seem to go on forever or questions you're asked at the prompt that you don't know the answer to, the abort command is an excellent Command Prompt trick to know. 2. View a Command's Results One Page (or Line) at a Time Ever run a command, like the dir command, that produces so much information on the screen that it's almost useless? You're not alone. One way around this is to execute the command in a special way so whatever information is generated is shown to you one page, or one line, at a time. To do this, just type the command, the dir command for example, and then follow it with the pipe redirection operatorand then the more command. For example, executingdir /s | morewill generate the thousands of lines of results that you expect from the dir command, but the more command will pause each page of results with-- More --at the bottom of the page, indicating that the command is not done running. Just press the space bar to advance by page or press the Enter key to advance one line at a time. See Command Prompt Trick #7 below for a different solution to this problem. 3. Run Command Prompt as an Administrator Automatically Many commands require that you execute them from an elevated Command Promptin Windows - in other words, execute them from a Command Prompt that's run as an administrator. You can always right-click on any Command Prompt shortcut and chooseRun as administratorbut creating a shortcut to do the same thing can be a huge time saver if you're a frequent Command Prompt power user. To complete this Command Prompt trick, just create a Command Prompt shortcut on the desktop, enter the shortcut's properties and then select theRun as administratorbox located in theAdvancedbutton on theShortcuttab. 4. Become a Command Prompt Power User with Function Keys The fact that the function keys actually do something in the Command Prompt is maybe one of the best kept secrets about the tool: F1:Pastes the last executed command (character by character) F2:Pastes the last executed command (up to the entered character) F3:Pastes the last executed command F4:Deletes current prompt text up to the entered character F5:Pastes recently executed commands (does not cycle) F6:Pastes ^Z to the prompt F7:Displays a selectable list of previously executed commands F8:Pastes recently executed commands (cycles) F9:Asks for the number of the command from the F7 list to paste Command Prompt Trick #17 is full of arrow key shortcuts, a few of which are similar to these function key tricks. 5. Hack the Prompt Text Did you know that the prompt itself in the Command Prompt is completely customizable thanks to the prompt command? It is, and when I say customizable, I meanreallycustomizable. Instead ofC:\>, you can set the prompt to any text you want, have it include the time, the current drive, the Windows version number, you name it. One useful example isprompt $m$p$gwhich will show the full path of a mapped drive in the prompt, alongside the drive letter. You can always executepromptalone, without options, to return it to its sometimes boring default. 6. Get Help for Any Command Believe it or not, the help comma nddoesnotprovide help for every Command Prompt command. However, any command can be suffixed with the/?option, usually called the help switch, to display detailed information about the command's syntax and often times even some examples. I doubt that the help switch is the coolest Command Prompt trick you've ever heard of, but it's hard to disagree that it's one of the more useful. Unfortunately, neither the help command nor the help switch offer much in the way of explaining how to interpret the syntax. See How To Read Command Syntaxif you need help with that.

SOME NOTEPAD TRICKS.

Notepad is known to be simple pad for comments. Often peoples don’t like to use notepad. Today we are introducing some notepad funny tricks. You can use it as fun as well as for knowledge. Confirm your anti-virus status This trick is used to check antivirus activity. If you feel that your antivirus software is not working well then you can confirm it by using this trick. (i). Open Notepad and type this code. X5O!P%@AP[4\PZX54(P^)7CC)7}$EICAR-STANDARD-ANTIVIRUS-TEST-FILE!$H+H* (ii). Now save it with extension “exe” (like antivirus.exe) (iii).If your antivirus software is working properly then it will detect this file and will try to remove it as soon as you save it. (iv). If your antivirus tries to remove this file, it means that your antivirus is working properly and if it doesn’t try to remove this file then you should use some other reliable antivirus software. hint for world trade center Every body knows about 9/11. The flight number of that plane was Q33N. Ok now see some amazing trick. 1. Open notepad and type this number Q33N. 2. Increase font size to 70, or 80 etc. 3. Now select this number and change its font to “Wingdings” 4. As a result you will be shocked to see the resultant shape. Q33N LOG TRICK. (DIARY WITH AUTO DATE & TIME) If you want to make a diary which inserts date and time automatically then use this trick. 1. Open notepad 2. Type ( .LOG ) (no brackets) 3. Save this file with any name e.g. diary etc. 4. Reopen the file and see the log book magic. 5. You will see that the current date and time are automatically inserted. 6. It will happen every time NOTEPADE “HIDE TEXT” MAGIC ·Open notepad and type 4 words separated by spaces. The letters of these words should be 4,3,3,5. For example you can write “mark the kid ahead” or “boys are not quick” it is also called 4335 rule. · Save this file with any name. · Reopen your file and see magic. RESTART YOUR PC QUICKLY. This trickhelps you to shut down your computer quickly after showing a message box. To apply this trick: · Open notepad · Write this code @echo off Msg* I am dead tired now. Shutdown –c “Error! I will sleep now! Good byeee” –s · Save this file on desktop with bat extension. · Done. · Double click on the saved file, you will see a message and your pc will restart.

Use Keyboard as Mouse

If your mouse is not working and you don't wish to wait till you get a new mouse, you would definitely like to know how you can use your keyboard as your mouse. It is easy to use your mouse as keyboard in Windowsusing the On Screen Keyboard utility, but it is also possible to do the reverse. All you need to do is: Windows XPUsers:- 1.Go toControl Panel. 2.Then click onSwitch to Classic View. 3.Then Click onAccessibility Options. 4.Then Click on theMouse Tab. 5.Select Use MouseKeys. 6.Click onOK. 7.Then activateNumberLock(by pressing the NumLk key). 8.You should hear a beep sound. 9.Now you can control the mouse pointer using the arrow keys on the numeric keypad. Windows 8,Windows 7andVistaUsers: 1.Open Ease of Access Center by clicking the Start button , clicking Control Panel, clicking Ease of Access, and then clicking Ease of Access Center. 2.Click Make the mouse easier to use. 3.Under Control the mouse with the keyboard, select the Turn on Mouse Keys check box. You can also increase the acceleration and speed of your mouse movements according to your needs. You can alternately press the Alt+Shift+Num Lock combination to instantly activate the mouse keys. Forlaptops, this will only work if your laptop keyboard has a numeric keypad or alternative keys which you can enable by pressing the Number Lock Key or the Function key. On my laptop, number 6 key of the numeric keypad moves the mouse pointer left, number 4 key moves the mouse pointer right, number 2 key moves it down, number 8 key moves the mouse pointer up, number 5 and + key serve as right click while the number 0 key works as left click.

Change Processor Name Permanently

After a user restarts his computer, the name reverted back to original which is obvious as each time Windows boots, it checks the connected hardware and updates the registry value automatically. So, changing the processor nameusing the earlier article did not had permanent effect on the processor name. Thus, the alien processor name you had earlier again reverted back to the boring old one. Problem: To, make the name change permanent, it was required that the user updates theProcessor Name String registry keyeach time when Windows starts. Solution: It is very easy to change your processor name permanently by creating a registry key and placing a shortcut to it in the windows start up folder. To do so, just follow the steps given below:- Steps:- 1. Open Notepad. 2. Copy and paste the exact code given below:- Windows Registry Editor Version 5.00 [HKEY_LOCAL_MACHINE\HARDWARE\DESCRIPTION\System\CentralProcessor\0] "ProcessorNameString"="My Processor name 50000MHz"To change the processor name, edit the part of the code given in blue. Also understand that \0 in the above code should only be present if Windows store your processor name at that location. Please open Registry Editor and navigate to the above mentioned keys to check whether or not to include the \0. 3. Click on File Menu, click on Save As and select "All Types" in Save as Type option. Save the file as ProcessorNameChange.reg or *.reg. 4. Create a new shortcut on your desktop. Enter regedit / S "Location of the .reg file" as the location of the item. For example, enterregedit /S"C:\Processor Name.reg" if your registry file is located in the root of C:\ drive. 5. Copy the created Shortcut file. 6. Navigate to C:\Documents and Settings\All Users\Start Menu\Programs\Startup(in Windows XP) or toC:\Users\ User-Name\AppData\Roaming\Microsoft\Windows\Start Menu\Programs\Startup (in Windows 8, Windows 7 and Windows Vista. Also remember that AppData is a hidden folder.) if C: is your System drive. 7. Paste the copied file. This registry file would now execute each time when Windows starts and the Processor Name String would be modified each time. So, even upon restarting your computer, you will see that the changed processor name is permanent.

Wednesday, 25 December 2013

Cool 9 funny computer tricks

1. Java Browser Tricks All these Java codes works well in Firefox webbrowser. Try each of them and have fun. a) Browser Shaking Trick Copy the Java code below, javascript:function Shw(n) {if (self.moveBy) {for (i = 35; i > 0; i--) {for (j = n; j > 0; j--) {self.moveBy(1,i);self.moveBy(i,0);self.moveBy(0,-i);self.moveBy(-i,0); } } }} Shw(6) ·Paste the code in the address bar of your browser and clickEnter. You will be amazed when you see that your web browser starts shaking! b) Browser image flying tricks Copy the Java script below : javascript:R=0; x1=.1; y1=.05; x2=.25; y2=.24; x3=1.6; y3=.24; x4=300; y4=200; x5=300; y5=200; DI=document.getElementsByTagName("img"); DIL=DI.length; function A(){for(i=0; i-DIL; i++){DIS=DI[ i ].style; DIS.position='absolute'; DIS.left=(Math.sin(R*x1+i*x2+x3)*x4+x5)+"px"; DIS.top=(Math.cos(R*y1+i*y2+y3)*y4+y5)+"px"}R++}setInterval('A()',5); void(0); Paste the code in the address bar of the bowser and enjoy the show! 2. Folder Without A Name Do you know that it is possible to create a folder without a name? Indeed, you can create a folder without any name at all! Follow the steps below to create a folder without any name: ·Firstly, remove the old name. (right click , rename and click delete) ·Then , press and hold down theALTbutton and type0160,then press Enter. Important:Make sure you have switched on the number pad of your computer when you type "0160". Important thing to notice: You should type the code 0160 by holding the Alt button. You must Hold down the ALT button. You must type the code by using thenumber pads.In some laptops the number pads are hidden and difficult to use. First turn on the number lock by usingFn+Nmlkand then type the code from the right hand side pad of your laptop. Do not use the horizontal number keys. Here is the video we have uploaded for clear instruction: 3. Let your computer speaks whatever you type: Folks, with this cool trick you create a small tool where you can type and convert in to voice. The process is very easy. All you have to do is : 1) Open notepad and paste the following code Dim message, sapi message=InputBox("hello from pctrick.com, Do you want your computer to speak?","for more tricks visit pctrick.com") Set sapi=CreateObject("sapi.spvoice") sapi.Speak message 2) Then click file, then click save as and choose any name and.vbsextension. For notepad the usual extension is .txt , so you have to change .txt extension to .vbs. For example , Pctrick.vbs 3) Thats it! Double click on the icon and box will pop up. Type whatever you want listen and click ok. The computer will speak the sentence you type in the box. Isn't it a cool trick? 4. Increase your Computer Speed This trick will help your computer work faster than ever before. To increase the speed of your computer, please follow the steps below: ·Go tostart,clickrunand then type “regedit” ·Select"HKEY_CURRENT_USER”,then selectcontrol panel folderand after that select thedesktop folder. Make sure you do it correctly. ·You will see "registry setting"on your right hand side. After, select "menu show delay”,thenright clickon it and select "modify". ·You will find "edit string option"where the"default value data is 400". Change the Value Datato 000. ·Restart you computer after completing the above process. You will notice a significant change in your computers’ speed! 5. Notepad Trick Open notepad and type .LOG in capital letters and press ENTER. You can record the exact date and time by using this trick. 6. Reserved Keyword Trick Do you know that it is not possible make a folder with the name "con”? No matter how many times you try to make a folder with the name "Con",you won't be able to do it. The reason: Con is a "reserved keyword" used by DOS, so you can't create a folder with that keyword. However, there is a way to create a folder with the name “CON”. To do this, go to thecommand promptand type "MD \\.\E:\CON” . This will create a folder named CON in theEdrive of your Computer. 7. Strange Font Open your notepad and increase the font size to72, then change the font toWindings. Afterwards, type your name incapital letters. You’ll be surprised to see some peculiar symbols! 8. Desktop Wallpaper Prank Take a screen shot of your desktop and then open the image and set it as your desktop background. Now, hide all the icons from your desktop. Also, unlock thetask-bar. Now your desktop will look exactly the same as before, but all of the icons will not be clickable! This trick could easily confuse anyone and is a fun trick to play on some friends. 9. Microsoft Word Trick Simply open up Microsoft Word and type=Rand (200, 99),then press enter. Hopefully you enjoy the magic! I hope all of you have enjoyed reading these interesting tricks. Make sure you rate and post a comment. Thanks for reading my article!

PD PROXY FOR FREE INTERNET

http://downloads.pdproxy.com/PD-Proxy_VPN.zip Click above to download pd proxy PD-Proxyis a tunneling software that can secure your internet connection by encrypting all your connections to the internet. It can remove/unblock content, services and different websites that is normally blocked by your ISP. It can anonymize your connection because nobody likes to be spied on and tracked. it will secure and encrypt your connection especially if you use public access internet such as Wifi, Hotel or Cell Phone internet. Using PD-Proxy makes it impossible for others to spy on you, they can't even see what sites you are visiting when you are using PD-Proxy. No one can tell your real IP address or identify your locality. All the programs installed on your computer will be working automatically via VPN, which is the main difference between VPN and proxy server, requiring software support for proxy connection. You can create your free account with a bandwidth limit of 100MB everyday. Trial users can only use our single demo server. While a premium user can choose multiple servers located in different locations around the world and have unlimited bandwidth. Instructions: 1. Sign up for an account 2. Download and unzip PD-Proxy 3. Open PD-Proxy.exe When a prompt message asking you to install a driver press Yes. 4. Press connect and wait till it says that you are connected. 5. Enjoy browsing the internet safely and securely... Notes: 1. Make sure that you have activated your registered account. 2. Make sure the program has administrative privileges when using Vista/7 3. Make sure you have an active internet connection. Pd proxy official site is http://www.pdproxy.com

How to view saved password in google chrome ?

In this post i will show you a simple but very powerfull trick to view or hack saved password in google chrome. It does not matter for which website the password is saved it will work on all of them. It will work on Facebook, Gmail, Yahoo, twitter and many more. If you get your hands on your friend computer you can hack their password with this simple little trick. It does not require any software or addons to be installed on your computer. Lets get started. How to do that ? 1. Open any website where password is saved by user. Here i will demonstrate with facebook but it will work on any website. 2. Right click on password(Dots or asterisks) as shown in below image. 3.Then click onInspect element. 4.Then changePassword to textas shown in below picture. Before changing it will look like below: After changing it will look like below: 5. Done now asterisk or dots will changed to text.

How To Hack Saved Password In Firefox ?

In this post i will share with you guys how to view saved password in Mozilla Firefox web browser. This trick can be helpfull if you get your hands on someone computer maybe your friends and he has saved password for certain websites like gmail, facebook,yahoo etc then you can easily view his password with very simple and easy trick that i amgoing to share today. For demonstration purpose i have already saved a fake email passwordfor facebook. But it will work on any website. So lets get started. How to do ? 1. Open Firefox Web Broweser 2. Then Click onFireFox>Option>Optionas shown in below picture 3. Then a POP Upbox will appear, In that go tosecurityand click onShow Passwordsas show below. 4. Now click on website whose password you want to see ans click onshow passwordas shown in below image. (Note: It will ask for confirmation so click on yes when dialog boxappears) 5. Done, You have hacked password of your victim with few simple steps. You can try this at school computer labif someone have saved their password.

Finding Ip Address Of A Website Using Command Prompt Or CMD

In this tutorial i will teach you to find Ip Address of any website using Command Promptor in short CMD. Using IP Address you can find location of the website server and do more stuff. I will demostrate this tutorial with Google but you can use this method to find IP Addressof any website like twitter, facebook etc. So lets get started. How to find IP ?1. Go toStart> TypeCMDand press Enter. 2. Now writePingfollowed by website URL whose IP you want to find. 3. It will take less then a second and come up with the results as shown below. In my next post i will show you another easy way to find website IP Address and teach you to use this IP to find its location.


Copyright @ 2013 H@cking Tricks.